BLTWindow: Difference between revisions
No edit summary |
|||
| Line 105: | Line 105: | ||
== See Also == | == See Also == | ||
[ | [[Plot Examples | Plot Commands]] | ||
Latest revision as of 16:11, 25 February 2009
BLT Window Operation
BLT Window Operation - BLT plot window's menus and options
Description
The BLT window offers control over the plot surface. There are menus that offer substantial control over the appearance of the various plot elements. A starting window appears with four menu pull downs and a blank drawing surface.
The menu is posted with a left button click. The window will remain up until an item is selected. This can be done "Mac" style - hold the left button down and release over an option. It also can be done motif style - a left click will post the menu, and a subsequent left button click on an option will unpost the menu and activate the option. All of the menus may be torn off by left clicking on the tear bar at the top of the menu.
- File Menu Commands
- Control of printing and save information
- Axis Menu Commands
- Control appearance of axes.
- Style Menu Commands
- Control of line style and appearance.
- Marker Menu Commands
- Control of marker properties and labels.
- Surface Hot Keys
- Plot Surface commands
File Menu
The file menu contains options that allow the graphics information to be saved and printed.
- New
- This command deletes all information from the plot, and clears the plot surface. It clears the current Plot File Name.
- Open
- Read a plot file with configuration and data and display the information. The user is prompted for a file name.
- Save
- Save the plot information and configuration into the current Plot File Name. The Plot File Name is displayed in the window above the plot surface. If the Plot File Name is empty, this command performs a save as option.
- Save As
- Prompt the user for a file name, and store the plot information and configuration into that file. The current Plot File Name is set by this command.
- Export
- Prompt the user for a file name, and store the plot information. The file type is readable by kaleidagraph and most spread sheet programs. The data is column oriented across the page.
- Image
- Prompt the user for a file name and store the current plot window as a gif image file.
- Page Setup
- This option brings up a dalog box.

The dialog box allows several main options that control printing. The box offers three major options, size, orientation, and color. Size can be specified in three ways. The plot can be scaled so that it will fit exactly in the page. This is specified with the "Fill Page" radio button. It can also be set to be the same size as the drawing in the window with the "Same as Window" radio button. Finally, a size can be entered in inches with "Set Size" radio button. If this last option is chosen, the width and height must be entered in inches. The orientation can either be landscape or portrait, and can be selected with the appropriate radio button. Default is landscape. Color options can also be selected from full color, grey scale, or black and white. Default is full color. When finished, either cancel or update will close the box. Update will change the stored configuration parameters.
- This option brings up a dialog box.

The dialog box allows several options. The graph can either be printed to a printer - radio button "Printer", or can be stored as an encapsulated postscript file (EPSF) with the "File" radio button. The options button brings up the [#PageSetup page setup] dialog box, described earlier. The Print Command string is prepended to the file operation to direct a file to the print. This default can be changed at [../Install.html installation]. The cancel button kills the operation and window. The print button will generate a file and direct it to the printer as determined by the settings.
- Set Defaults
- Store current plot configuration defaults for axis, postscript, legends, and titles to the preference file "~/.floopsblt_rc". These defaults are read at startup.
- Quit
- Exit the program through a reassuring dialog box.
Axis Menu
This file menu allows options for the axis to be set. Each of the listed options - X Axis, Y Axis, X2 Axis, and Y Axis, bring up the same dialog box. The only difference is in the title of the dialog box which indicates the axis being set.

The upper part of the control panel allows the axis label to be set. The default is no label. The Name Font button brings up a font selection box. Not all font combinations are available on all systems! A warning is given if an combination is selected that is not present.
The middle section controls the type of axis and its limits. The top row contains three toggle buttons. The first controls if the axis is linear or log scale. The second box controls if the axis are fit exactly are rounded to an "even" number. The final box controls if the axis has increasing values in the right/up direction or decreasing. The defaults are linear, exact, and increasing.
The next boxes control the displayed axis. The minimum and maximum can be set to specified values. If the autoscale button is hit, the boxes are emptied are the plot will autoscale to contain all elements. The axis limits can also be modified using the zoom features in the plot [#Surface surface hot keys].
The final row contains two options. Display indicates if an axis is drawn or not. The default is displayed. The tick font can also be set independently here. Update and cancel both kill the window, and update updates the axis to reflect the choices made.
Style Menu
This file allows the legend and pen styles options to be set. Each line on the graph can have its configuration and properties altered. The legend and title can also be changed.
- Legend Dialog
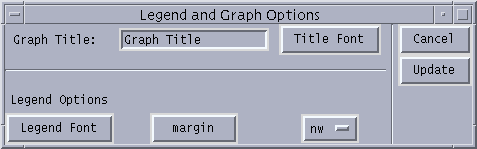

The top part of the box controls the graph title. A new title can be selected, and the title font can be changed. If the title is set to the empty string, the title will not be displayed. The bottom half controls the legend. The font for the legend can be changed. The toggle button controls whether the legend is drawn in the margin or on the plot surface itself. The final button allows a corner to be selected for the legend display. The legend can be moved around the plot to be out of the way of the data. On the right side, are the customary buttons controlling termination of the dialog. The cancel button leaves things unchanged, and the update button loads the new values into the window. Both kill the dialog box.
- Pen Dialog
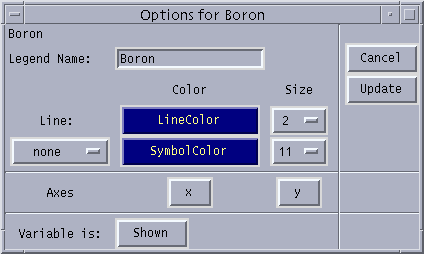

The pen dialog box controls the options for a particular plot variable. In the upper section, the drawing properties can be selected. The display name in the legend can be entered. Below that the line display properties can be chosen. There are tow main rows of options for displaying the line. In the first, the line style can be selected. In the second, the symbol can be selected. Both display choices have similar options. The line and symbol color buttons both bring up dialog boxes that allow selection of a color from the rgb color map. The size refers to the point size of the line or symbol. The size can be selected from 0 on up. Lines of zero will not appear, which will lead to a scatter plot format. Symbols of size zero will also not be visible. The symbol type can be selected from the choice button. The next row down controls the axis display. Double y or double x plots are possible. The default axis are x and y. The final row allows a user to turn off display of particular variables. They will still be stored, but can be temporarily turned off. On the right side, are the customary buttons controlling termination of the dialog. The cancel button leaves things unchanged, and the update button loads the new values into the window. Both kill the dialog box.
Marker Menu
This shows the markers available in the plot Selecting one brings up the marker dialog box which allows the line and fill color to be changed. A region can also be set to be completely filled.
Surface Hot Keys
- Left Button
- Starts a zoom-in procedure call. The cross hairs change to a dotted box, and a second left button click defines the zoom region.
- Right Button
- Pops the zoom sequence. This does not return to outer level, just one zoom back.
Bugs and Missing Features
Markers still don`t always update automatically.
Font selection is a pain.